> ## Documentation Index
> Fetch the complete documentation index at: https://docs.liv.tv/llms.txt
> Use this file to discover all available pages before exploring further.
# Installing and Configuring LIV SDK
This section provides a detailed, step-by-step guide for downloading, installing, and configuring the LIV SDK in Unreal Engine. By following these instructions, you can successfully integrate the SDK into your VR project, ensuring a smooth development process.
## **Prerequisites**
Before proceeding with installation, confirm the following requirements:
### **Unreal Engine Versions**
* **Supported Versions**:
* Unreal Engine **4.26 to 5.4** for Green Screen and Immersive MR features.
* Unreal Engine **5.4+** (Meta Fork required) for Meta Presence Platform features.
### **DirectX**
* **Required Version**: DirectX **11**.
**Note**: LIV does **not support DirectX 12**.
### **Visual Studio**
* **Supported Versions**:
* **2019** or **2022 (Required for UE5)** for building the project.
## **How to Get the LIV SDK**
The LIV SDK plugin can be obtained from the official LIV website:
* [LIV Portal](https://dev.liv.tv/)
## **Installation Process**
Follow these steps to install the LIV plugin in your Unreal Engine project:
### **Step 1: Extract the Plugin Files**
1. After downloading the SDK, extract the contents of the ZIP file.
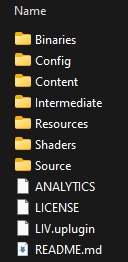
2. Ensure the extracted folder contains the following:
* `LIV.uplugin`
* Subfolders: `Source`, `Content`, etc.
 ### **Step 2: Place the Plugin in Your Project**
1. Navigate to the root directory of your Unreal Engine project.
2. Create a folder named `Plugins` (if it does not already exist).
3. Copy the **LIV** plugin folder into the `Plugins` directory:
`[YourProjectRoot]/Plugins/LIV`
Note: Unreal Engine searches for project-specific plugins in the Plugins folder. Placing the LIV plugin here ensures proper integration with your project.
### **Step 3: Enable C++ Support**
If your project does not already support C++:
1. Open Unreal Engine
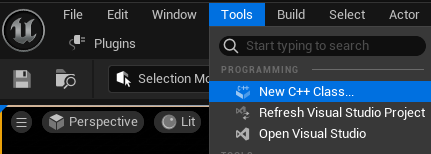
2. Navigate to **Tools > New C++ Class**.
3. Create an empty class to enable the required C++ infrastructure for your project.
### **Step 2: Place the Plugin in Your Project**
1. Navigate to the root directory of your Unreal Engine project.
2. Create a folder named `Plugins` (if it does not already exist).
3. Copy the **LIV** plugin folder into the `Plugins` directory:
`[YourProjectRoot]/Plugins/LIV`
Note: Unreal Engine searches for project-specific plugins in the Plugins folder. Placing the LIV plugin here ensures proper integration with your project.
### **Step 3: Enable C++ Support**
If your project does not already support C++:
1. Open Unreal Engine
2. Navigate to **Tools > New C++ Class**.
3. Create an empty class to enable the required C++ infrastructure for your project.
 ### **Step 4: Generate Visual Studio Project Files**
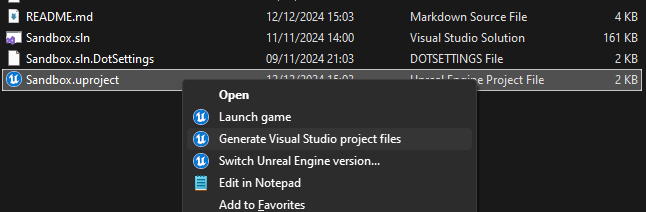
1. Right-click on the project’s `.uproject` file.
2. Select **"Generate Visual Studio project files"**.
### **Step 4: Generate Visual Studio Project Files**
1. Right-click on the project’s `.uproject` file.
2. Select **"Generate Visual Studio project files"**.
 ### **Step 5: Build the Project**
There are two ways to build the project: using **Visual Studio** or the **Command Line**.
### **Option 1: Build with Visual Studio**
1. Open the `.sln` file in Visual Studio.
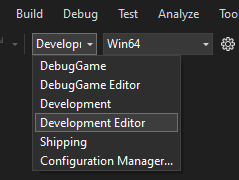
2. Configure the solution:
* **Solution Configuration**: `Development Editor`
* **Solution Platform**: `Win64`
### **Step 5: Build the Project**
There are two ways to build the project: using **Visual Studio** or the **Command Line**.
### **Option 1: Build with Visual Studio**
1. Open the `.sln` file in Visual Studio.
2. Configure the solution:
* **Solution Configuration**: `Development Editor`
* **Solution Platform**: `Win64`
 C:\Users\freya\Documents\GitHub\docs\public\sdk-unreal-v2\step5-1.png
3. In the Solution Explorer, right-click on the project target (ex: Sandbox) and select Build.
C:\Users\freya\Documents\GitHub\docs\public\sdk-unreal-v2\step5-1.png
3. In the Solution Explorer, right-click on the project target (ex: Sandbox) and select Build.
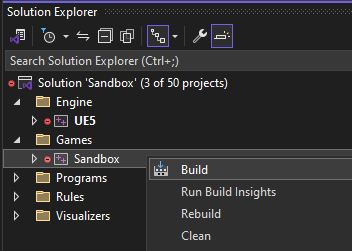 ### **Option 2: Build Using Command Line**
1. Open a terminal in admin mode.
2. Use the following command:
1. Unreal Engine built from Source :
`& "[UnrealEnginePath]\Engine\Build\BatchFiles\Build.bat" -Target="[ProjectTarget] Win64 Development" -Project="[PathToUProject]" -Target="ShaderCompileWorker Win64 Development" -WaitMutex -FromMsBuild -architecture=x64`
2. Unreal Engine from Launcher :
`& "[UnrealEnginePath]\Engine\Build\BatchFiles\Build.bat" -Target="[ProjectTarget] Win64 Development" -Project="[PathToUProject]" -WaitMutex -FromMsBuild -architecture=x64`
3. Replace placeholders as follows:
* `[UnrealEnginePath]`: Path to Unreal Engine installation.
* `[ProjectTarget]`: Project target name (ex: `Sandbox`).
* `[PathToUProject]`: Full path to the `.uproject` file.
Note: If you are using a pre-compiled Unreal Engine (Launcher version), omit the ShaderCompileWorker target to avoid errors.
### **Step 6: Launch the Project**
1. Locate the Unreal Engine executable:
* **Source Build**: `[SourceBuildPath]\Engine\Binaries\Win64\UE5Editor.exe`
* **Launcher Version**: Use the **Epic Games Launcher** to open the project.
2. Open the `.uproject` file in the editor.
## **Configuring the LIV Plugin**
After installing the plugin, configure it within Unreal Engine:
### **Step 1: Enable the LIV Plugin**
1. In Unreal Editor, navigate to **Edit > Plugins**.
2. Search for "LIV".
3. Check if the plugin is enabled.
4. If not, enable and restart the editor when prompted.
### **Option 2: Build Using Command Line**
1. Open a terminal in admin mode.
2. Use the following command:
1. Unreal Engine built from Source :
`& "[UnrealEnginePath]\Engine\Build\BatchFiles\Build.bat" -Target="[ProjectTarget] Win64 Development" -Project="[PathToUProject]" -Target="ShaderCompileWorker Win64 Development" -WaitMutex -FromMsBuild -architecture=x64`
2. Unreal Engine from Launcher :
`& "[UnrealEnginePath]\Engine\Build\BatchFiles\Build.bat" -Target="[ProjectTarget] Win64 Development" -Project="[PathToUProject]" -WaitMutex -FromMsBuild -architecture=x64`
3. Replace placeholders as follows:
* `[UnrealEnginePath]`: Path to Unreal Engine installation.
* `[ProjectTarget]`: Project target name (ex: `Sandbox`).
* `[PathToUProject]`: Full path to the `.uproject` file.
Note: If you are using a pre-compiled Unreal Engine (Launcher version), omit the ShaderCompileWorker target to avoid errors.
### **Step 6: Launch the Project**
1. Locate the Unreal Engine executable:
* **Source Build**: `[SourceBuildPath]\Engine\Binaries\Win64\UE5Editor.exe`
* **Launcher Version**: Use the **Epic Games Launcher** to open the project.
2. Open the `.uproject` file in the editor.
## **Configuring the LIV Plugin**
After installing the plugin, configure it within Unreal Engine:
### **Step 1: Enable the LIV Plugin**
1. In Unreal Editor, navigate to **Edit > Plugins**.
2. Search for "LIV".
3. Check if the plugin is enabled.
4. If not, enable and restart the editor when prompted.
.png?fit=max&auto=format&n=v4zFUEfIihMyS4q1&q=85&s=d6f3d8db6b2d7c2beb8af6ac31810997) ### **Step 2: Adjust LIV Plugin Settings**
1. Go to **Edit > Project Settings**.
2. Scroll to the **Plugins > LIV** section.
### **Step 2: Adjust LIV Plugin Settings**
1. Go to **Edit > Project Settings**.
2. Scroll to the **Plugins > LIV** section.
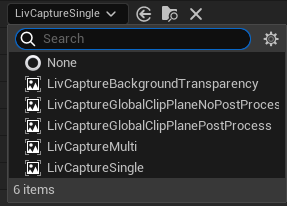
.png?fit=max&auto=format&n=d5BqcNqWKo-hqgIO&q=85&s=790d7b69dd590236acb460434c632097) 3. Configure the following options:
* **Capture Method**:
* Default: `ULivCaptureSingle` (fastest performance).
* `LivCaptureBackgroundTransparency`
* `LivCaptureGlobalClipPlaneNoPostProcess`
* `LivCaptureGlobalClipPlanePostProcess`
* `LivCaptureMulti`
3. Configure the following options:
* **Capture Method**:
* Default: `ULivCaptureSingle` (fastest performance).
* `LivCaptureBackgroundTransparency`
* `LivCaptureGlobalClipPlaneNoPostProcess`
* `LivCaptureGlobalClipPlanePostProcess`
* `LivCaptureMulti`
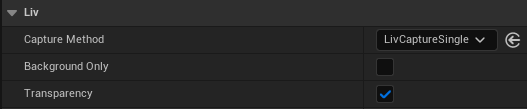
 * **Background Only**: Enable for simpler MR captures.
* **Transparency**: Enable to support translucent objects.
* **Background Only**: Enable for simpler MR captures.
* **Transparency**: Enable to support translucent objects.
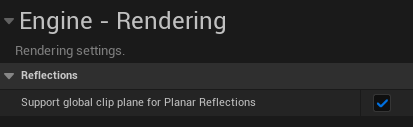
 * **Global Clip Plane**: Required for advanced capture methods.
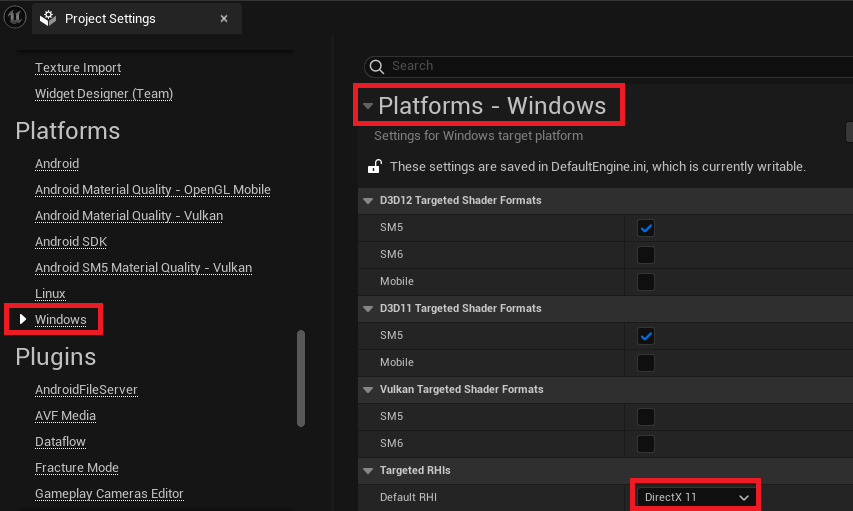
 ### **Step 3: Switch to DirectX 11**
1. Open **Edit > Project Settings > Platforms > Windows**.
2. Set the **Default RHI** to **DirectX 11**.
3. Restart the editor to apply changes.
Note: DirectX 12 is **not supported** yet.
### **Step 3: Switch to DirectX 11**
1. Open **Edit > Project Settings > Platforms > Windows**.
2. Set the **Default RHI** to **DirectX 11**.
3. Restart the editor to apply changes.
Note: DirectX 12 is **not supported** yet.
 ## **Testing the LIV Plugin**
Once installed and configured, test the plugin to ensure functionality:
### **Step 1: Package the Project**
1. In Unreal Editor, go to **File > Package Project > Windows**.
2. Choose a directory for the packaged build.
3. Package the project.
## **Testing the LIV Plugin**
Once installed and configured, test the plugin to ensure functionality:
### **Step 1: Package the Project**
1. In Unreal Editor, go to **File > Package Project > Windows**.
2. Choose a directory for the packaged build.
3. Package the project.
 ### **Step 2: Validate with the LIV App**
1. Download and set up the **LIV App**:
* [LIV App Setup Guide](https://help.liv.tv/hc/en-us/articles/19370309456402)
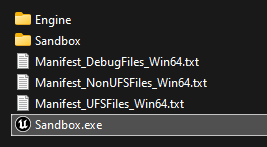
2. Launch the LIV App and ensure it detects the packaged `.exe` file.
### **Step 2: Validate with the LIV App**
1. Download and set up the **LIV App**:
* [LIV App Setup Guide](https://help.liv.tv/hc/en-us/articles/19370309456402)
2. Launch the LIV App and ensure it detects the packaged `.exe` file.
 3. Test MR output with Mixed Reality Capture Mode.