> ## Documentation Index
> Fetch the complete documentation index at: https://docs.liv.tv/llms.txt
> Use this file to discover all available pages before exploring further.
# Tips And Configurations
## **Advanced Configuration**
Advanced configurations allow you to customize LIV SDK behavior to fit your project’s unique requirements. These configurations optimize capture methods, enable advanced rendering features, and address specific use cases like transparency and global clipping planes.
### **Capture Methods**
The LIV SDK offers multiple **capture methods** to balance performance, transparency support, and post-processing effects. Selecting the correct method depends on the requirements of your project.
| Capture Method | Speed | Transparency | Post-Processing | Use Case |
| :----------------------------------------------- | :------- | :------------- | :-------------- | :-------------------------------------------------------------------------------------------- |
| LivCaptureSingle | Fastest | ❌ | ✅ | Best for performance-critical scenarios where transparency and layering are not required. |
| LivCaptureGlobalClipPlaneNoPostProcess | Moderate | ✅ | ❌ | Use for transparent materials when post-processing effects (ex: bloom) are not needed. |
| LivCaptureGlobalClipPlanePostProcess | Slower | ✅ | ✅ | Use when full transparency and post-processing effects (ex: reflections, bloom) are required. |
| LivCaptureBackgroundTransparency (WIP don't use) | Moderate | ✅ (Background) | ❌ | Captures only the background layer with transparency. The player remains excluded. |
| LivCaptureMulti (WIP don't use) | Moderate | ✅ | ✅ | Use for multi-layer captures where both transparency and post-processing are needed. |
**How to Configure**:
1. Go to **Edit > Project Settings > Plugins > LIV**.
2. Select the method appropriate to your project requirements:
* Use `LivCaptureSingle` for maximum performance.
* Use `LivCaptureGlobalClipPlaneNoPostProcess` or `LivCaptureGlobalClipPlanePostProcess`for transparency.
### **Enable Transparency**
**Context:** Transparency is crucial for rendering translucent objects like **glass, holograms, and effects**. To display transparency correctly, specific capture methods and material settings must be configured.
**Steps to Enable Transparency:**
1. Use one of these supported capture methods:
* `LivCaptureGlobalClipPlaneNoPostProcess`
* `LivCaptureGlobalClipPlanePostProcess`
**Common Issues - Transparency Not Rendering**:
* Ensure the material **Blend Mode** is set to **Translucent** (see Material Configuration).
* Confirm that **Global Clip Plane** is enabled.
### **Global Clip Plane**
**Context**
The **Global Clip Plane** is essential for splitting the MR capture into separate layers (foreground, background, player). Without it, occlusion will fail, and players or objects may render incorrectly above everything else.
**Steps to Enable Global Clip Plane:**
1. Navigate to **Edit > Project Settings > Engine > Rendering > Reflections**.
2. Enable **Support Global Clip Plane**.
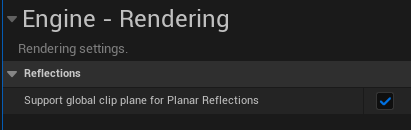 3. Restart the editor to apply the settings.
**Use Case - Required for:**
* `LivCaptureGlobalClipPlaneNoPostProcess`
* `LivCaptureGlobalClipPlanePostProcess`
* Scenes with foreground transparency requiring correct occlusion.
### **Material Configuration for Additive Transparency**
**Context:** Materials using **Additive Blend Mode** skip depth testing, causing them to always render in front of other objects. This disrupts occlusion and breaks MR layering in LIV.
**Steps to Fix Additive Materials:**
1. Open the **Material Editor** for the problematic object.
2. In the **Details Panel**:
* Change **Blend Mode** to **Translucent**.
* Uncheck **Disable Depth Test**.
3. Adjust material properties:
* Use **Opacity** to control translucency.
* Add **Emissive Color** for glowing effects without additive blending.
**What This Fix Does:** Ensures the material interacts with the depth buffer, allowing LIV to render it properly with correct occlusion.
### Fixing the Permutation Error Bug on Packaged build
**Context**
The **Permutation Error** occurs when Unreal Engine fails to load the LIV plugin due to an issue with the `EngineVersion` field in the `LIV.uplugin` file. This happens when switching between the **stock Unreal Engine** and the **Meta Fork**.
* **Scenario 1: Stock Unreal Engine**
If the error occurs in the **stock engine**, the issue is caused by the presence of the `EngineVersion` field.
**Fix**:
1. Navigate to the LIV plugin file:
`[YourProjectRoot]/Plugins/LIV/LIV.uplugin`
2. Open `LIV.uplugin` in a text editor.
3. Remove the **EngineVersion** line:
`"EngineVersion": "X.X.X"`
4. Save the file and restart Unreal Engine.
* **Scenario 2: Meta Fork**
If the error occurs in the **Meta Fork**, the issue is caused by the **absence** of the `EngineVersion` field, or a non-exact matching `EngineVersion`.
**Fix**:
1. Navigate to the LIV plugin file:
`[YourProjectRoot]/Plugins/LIV/LIV.uplugin`
2. Open `LIV.uplugin` in a text editor.
3. Add the correct **EngineVersion** line. Replace `"X.X.X"` with the **exact Meta Fork version** you are using.
`"EngineVersion": "5.4.3"`
4. Save the file and restart Unreal Engine. **Summary**
| Engine Type | Issue | Solution |
| :----------- | :-------------------------------- | :-------------------------------------------------------------- |
| Stock Engine | `EngineVersion` field exists. | Remove the `"EngineVersion"` line in `LIV.uplugin`. |
| Meta Fork | `EngineVersion` field is missing. | Add the `"EngineVersion": "X.X.X"` line with the exact version. |
### Meta Features (Optional)
For projects using the Meta Fork and Presence Platform:
1. Enable **Passthrough**, **Scene API**, and **Spatial Anchors** in **Plugins > Meta XR**.
2. Configure the Scene API to interact with the real-world environment.
3. Test Spatial Anchors for persistent object placement across sessions.
### Meta XR Integration
The Meta XR Plugin enables advanced features such as Passthrough, Scene API, and Spatial Anchors using the Stock Unreal Engine. **Requirements**
* **Meta XR Plugin Version**: Minimum **65.0**.
* **Unreal Engine Version**: **5.3.2** or higher.
* **Location**: The Meta XR Plugin must be placed in the **Marketplace** (or **Fab**) directory of the Unreal Engine installation.
**Steps to Integrate the Meta XR Plugin**
**1. Locate or Create the Marketplace Directory** The Meta XR Plugin must reside in the engine's **Marketplace** folder.
* Navigate to your Unreal Engine installation directory: `[UnrealEnginePath]/Engine/Plugins/Marketplace/`
* If the **Marketplace** folder does not exist, create it manually.
**2. Install the Meta XR Plugin**
* Download the **Meta XR Plugin (Version 65.0 or higher)** from the [Meta Developer Portal](https://developers.meta.com/horizon/downloads/package/unreal-engine-5-integration/).
* Extract the plugin files.
* Place the extracted plugin folder (**MetaXR**) into the **Marketplace** directory: `[UnrealEnginePath]/Engine/Plugins/Marketplace/MetaXR/`
**3. Enable the Meta XR Plugin in Unreal Engine**
* Open Unreal Engine.
* Go to **Edit > Plugins**.
* Search for **Meta XR** and enable the following plugins:
* **MetaXR**: For advanced Presence Platform features.
* **OculusXR**: Core integration for Meta VR devices.
* Restart the Unreal Editor to apply the changes.
**4. Configure Meta XR Features**
* Open **Edit > Project Settings > Meta XR**.
* Enable the features you need:
* **Passthrough**: Allows real-world visuals to blend with MR content.
3. Restart the editor to apply the settings.
**Use Case - Required for:**
* `LivCaptureGlobalClipPlaneNoPostProcess`
* `LivCaptureGlobalClipPlanePostProcess`
* Scenes with foreground transparency requiring correct occlusion.
### **Material Configuration for Additive Transparency**
**Context:** Materials using **Additive Blend Mode** skip depth testing, causing them to always render in front of other objects. This disrupts occlusion and breaks MR layering in LIV.
**Steps to Fix Additive Materials:**
1. Open the **Material Editor** for the problematic object.
2. In the **Details Panel**:
* Change **Blend Mode** to **Translucent**.
* Uncheck **Disable Depth Test**.
3. Adjust material properties:
* Use **Opacity** to control translucency.
* Add **Emissive Color** for glowing effects without additive blending.
**What This Fix Does:** Ensures the material interacts with the depth buffer, allowing LIV to render it properly with correct occlusion.
### Fixing the Permutation Error Bug on Packaged build
**Context**
The **Permutation Error** occurs when Unreal Engine fails to load the LIV plugin due to an issue with the `EngineVersion` field in the `LIV.uplugin` file. This happens when switching between the **stock Unreal Engine** and the **Meta Fork**.
* **Scenario 1: Stock Unreal Engine**
If the error occurs in the **stock engine**, the issue is caused by the presence of the `EngineVersion` field.
**Fix**:
1. Navigate to the LIV plugin file:
`[YourProjectRoot]/Plugins/LIV/LIV.uplugin`
2. Open `LIV.uplugin` in a text editor.
3. Remove the **EngineVersion** line:
`"EngineVersion": "X.X.X"`
4. Save the file and restart Unreal Engine.
* **Scenario 2: Meta Fork**
If the error occurs in the **Meta Fork**, the issue is caused by the **absence** of the `EngineVersion` field, or a non-exact matching `EngineVersion`.
**Fix**:
1. Navigate to the LIV plugin file:
`[YourProjectRoot]/Plugins/LIV/LIV.uplugin`
2. Open `LIV.uplugin` in a text editor.
3. Add the correct **EngineVersion** line. Replace `"X.X.X"` with the **exact Meta Fork version** you are using.
`"EngineVersion": "5.4.3"`
4. Save the file and restart Unreal Engine. **Summary**
| Engine Type | Issue | Solution |
| :----------- | :-------------------------------- | :-------------------------------------------------------------- |
| Stock Engine | `EngineVersion` field exists. | Remove the `"EngineVersion"` line in `LIV.uplugin`. |
| Meta Fork | `EngineVersion` field is missing. | Add the `"EngineVersion": "X.X.X"` line with the exact version. |
### Meta Features (Optional)
For projects using the Meta Fork and Presence Platform:
1. Enable **Passthrough**, **Scene API**, and **Spatial Anchors** in **Plugins > Meta XR**.
2. Configure the Scene API to interact with the real-world environment.
3. Test Spatial Anchors for persistent object placement across sessions.
### Meta XR Integration
The Meta XR Plugin enables advanced features such as Passthrough, Scene API, and Spatial Anchors using the Stock Unreal Engine. **Requirements**
* **Meta XR Plugin Version**: Minimum **65.0**.
* **Unreal Engine Version**: **5.3.2** or higher.
* **Location**: The Meta XR Plugin must be placed in the **Marketplace** (or **Fab**) directory of the Unreal Engine installation.
**Steps to Integrate the Meta XR Plugin**
**1. Locate or Create the Marketplace Directory** The Meta XR Plugin must reside in the engine's **Marketplace** folder.
* Navigate to your Unreal Engine installation directory: `[UnrealEnginePath]/Engine/Plugins/Marketplace/`
* If the **Marketplace** folder does not exist, create it manually.
**2. Install the Meta XR Plugin**
* Download the **Meta XR Plugin (Version 65.0 or higher)** from the [Meta Developer Portal](https://developers.meta.com/horizon/downloads/package/unreal-engine-5-integration/).
* Extract the plugin files.
* Place the extracted plugin folder (**MetaXR**) into the **Marketplace** directory: `[UnrealEnginePath]/Engine/Plugins/Marketplace/MetaXR/`
**3. Enable the Meta XR Plugin in Unreal Engine**
* Open Unreal Engine.
* Go to **Edit > Plugins**.
* Search for **Meta XR** and enable the following plugins:
* **MetaXR**: For advanced Presence Platform features.
* **OculusXR**: Core integration for Meta VR devices.
* Restart the Unreal Editor to apply the changes.
**4. Configure Meta XR Features**
* Open **Edit > Project Settings > Meta XR**.
* Enable the features you need:
* **Passthrough**: Allows real-world visuals to blend with MR content.
.png?fit=max&auto=format&n=U3Ku3hHnC3Fz2QjB&q=85&s=ab8df527fc81d16043d5228f4cde7f4a) * **Scene API**: Detects and interacts with real-world geometry.
* **Scene API**: Detects and interacts with real-world geometry.
.png?fit=max&auto=format&n=rOjkTDQ_qIFlf8D7&q=85&s=19624a94953526ae7c53c2c3d46751de) * **Spatial Anchors**: Supports persistent placement of virtual objects.
* **Spatial Anchors**: Supports persistent placement of virtual objects.
.png?fit=max&auto=format&n=rCtn5vMmaHe_RvRp&q=85&s=ac4e105685b9558575830f92f4934998) **Common Issues with Meta XR Integration**
| Issue | Cause | Solution |
| :---------------------------------------------- | :---------------------------------------------------- | :------------------------------------------------------------------------------ |
| Meta XR Plugin Not Detected / Oculus XR missing | Plugin not placed in the correct directory. | Ensure it is located in `[UnrealEnginePath]/Engine/Plugins/Marketplace/MetaXR`. |
| Passthrough Not Working | Plugin not enabled or VR headset compatibility issue. | Enable Meta XR features in `Project Settings > Meta XR`. |
## **FAQ and Tips**
This section addresses common issues and provides practical tips to optimize your LIV SDK experience.
### Common Issues and Solutions
| Issue | Cause | Solution |
| :------------------------------- | :---------------------------------------------------- | :-------------------------------------------------------------------------------------------------- |
| LIV Plugin Not Detected | Plugin folder is misplaced or not enabled. | Ensure the plugin is in the correct `Plugins` folder and is enabled in the Unreal Editor. |
| Transparency Not Working | Incorrect capture method or material settings. | Use `LivCaptureGlobalClipPlaneNoPostProcess` or `PostProcess` and set material to `Translucent`. |
| DirectX 12 Errors | DirectX 12 is not supported. | Switch to `DirectX 11` in `Project Settings > Platforms > Windows > Default RHI`. |
| Player Renders Above Everything | `Global Clip Plane` is disabled. | Enable `Support Global Clip Plane` in `Project Settings > Rendering > Reflections`. |
| Additive Materials Always on Top | Additive blend mode skips depth testing. | Open the `Material Editor`, switch `Blend Mode` to `Translucent`, and uncheck `Disable Depth Test`. |
| Performance Drops in MR Output | High rendering load (translucent materials, effects). | Optimize materials, reduce translucency usage, and monitor performance with `Stat Unit`. |
| Meta Fork Features Not Working | Incorrect Meta Fork setup or build process. | Ensure the `Meta Fork` is downloaded, built correctly, and configured in Unreal Engine. |
### Tips for a Smooth Workflow
**Switch to DirectX 11**
* The LIV SDK does not support DirectX 12.
* Go to **Edit > Project Settings > Platforms > Windows** and set **Default RHI** to **DirectX 11**.
**Optimize Scene Performance**
1. Minimize the use of translucent materials.
2. Avoid overloading the scene with dynamic lighting and complex shaders.
3. Use **Stat Unit** and **Stat FPS** commands to monitor performance.
**Enable Logs for Debugging**
* Run your packaged build with the `log` flag to view detailed logs:
`"[GamePath]\MyGame.exe" -log`
**Package Builds Correctly**
1. Use **Development** or **Shipping** configuration when packaging.
2. Ensure the build is targeted for **Windows 64-bit**.
**Test on Target Hardware**
* Always test your project on the VR hardware it is intended for to identify any compatibility or performance issues early.
**Monitor Logs for Issues**:
* Run builds with the `log` flag to identify and resolve rendering errors.
### Advanced Troubleshooting
**Performance Bug (UE-86191)** Unreal Engine may exhibit a performance bug when using MR capture with certain configurations. To fix this:
1. Open the `DefaultEngine.ini` file in your project directory.
2. Add the following lines:
`[/Script/Engine.RendererSettings] r.SceneRenderTargetResizeMethod=2 r.SceneRenderTargetResizeMethodForceOverride=True`
**Command-Line Packaging**
* If packaging fails in the editor, use the command line:
`& "[UnrealEnginePath]\Engine\Build\BatchFiles\RunUAT.bat" BuildCookRun -project="[PathToUProject]" -platform=Win64 -clientconfig=Development -serverconfig=Development -cook -build -stage -pak -archive -archivedirectory="[OutputFolder]"`
**Common Issues with Meta XR Integration**
| Issue | Cause | Solution |
| :---------------------------------------------- | :---------------------------------------------------- | :------------------------------------------------------------------------------ |
| Meta XR Plugin Not Detected / Oculus XR missing | Plugin not placed in the correct directory. | Ensure it is located in `[UnrealEnginePath]/Engine/Plugins/Marketplace/MetaXR`. |
| Passthrough Not Working | Plugin not enabled or VR headset compatibility issue. | Enable Meta XR features in `Project Settings > Meta XR`. |
## **FAQ and Tips**
This section addresses common issues and provides practical tips to optimize your LIV SDK experience.
### Common Issues and Solutions
| Issue | Cause | Solution |
| :------------------------------- | :---------------------------------------------------- | :-------------------------------------------------------------------------------------------------- |
| LIV Plugin Not Detected | Plugin folder is misplaced or not enabled. | Ensure the plugin is in the correct `Plugins` folder and is enabled in the Unreal Editor. |
| Transparency Not Working | Incorrect capture method or material settings. | Use `LivCaptureGlobalClipPlaneNoPostProcess` or `PostProcess` and set material to `Translucent`. |
| DirectX 12 Errors | DirectX 12 is not supported. | Switch to `DirectX 11` in `Project Settings > Platforms > Windows > Default RHI`. |
| Player Renders Above Everything | `Global Clip Plane` is disabled. | Enable `Support Global Clip Plane` in `Project Settings > Rendering > Reflections`. |
| Additive Materials Always on Top | Additive blend mode skips depth testing. | Open the `Material Editor`, switch `Blend Mode` to `Translucent`, and uncheck `Disable Depth Test`. |
| Performance Drops in MR Output | High rendering load (translucent materials, effects). | Optimize materials, reduce translucency usage, and monitor performance with `Stat Unit`. |
| Meta Fork Features Not Working | Incorrect Meta Fork setup or build process. | Ensure the `Meta Fork` is downloaded, built correctly, and configured in Unreal Engine. |
### Tips for a Smooth Workflow
**Switch to DirectX 11**
* The LIV SDK does not support DirectX 12.
* Go to **Edit > Project Settings > Platforms > Windows** and set **Default RHI** to **DirectX 11**.
**Optimize Scene Performance**
1. Minimize the use of translucent materials.
2. Avoid overloading the scene with dynamic lighting and complex shaders.
3. Use **Stat Unit** and **Stat FPS** commands to monitor performance.
**Enable Logs for Debugging**
* Run your packaged build with the `log` flag to view detailed logs:
`"[GamePath]\MyGame.exe" -log`
**Package Builds Correctly**
1. Use **Development** or **Shipping** configuration when packaging.
2. Ensure the build is targeted for **Windows 64-bit**.
**Test on Target Hardware**
* Always test your project on the VR hardware it is intended for to identify any compatibility or performance issues early.
**Monitor Logs for Issues**:
* Run builds with the `log` flag to identify and resolve rendering errors.
### Advanced Troubleshooting
**Performance Bug (UE-86191)** Unreal Engine may exhibit a performance bug when using MR capture with certain configurations. To fix this:
1. Open the `DefaultEngine.ini` file in your project directory.
2. Add the following lines:
`[/Script/Engine.RendererSettings] r.SceneRenderTargetResizeMethod=2 r.SceneRenderTargetResizeMethodForceOverride=True`
**Command-Line Packaging**
* If packaging fails in the editor, use the command line:
`& "[UnrealEnginePath]\Engine\Build\BatchFiles\RunUAT.bat" BuildCookRun -project="[PathToUProject]" -platform=Win64 -clientconfig=Development -serverconfig=Development -cook -build -stage -pak -archive -archivedirectory="[OutputFolder]"`